TRIPAWDS: Home to 23085 Members and 2157 Blogs.
HOME » NEWS » BLOGS » FORUMS » CHAT » YOUR PRIVACY » RANDOM BLOG

Trimming the Fat

I did it!WordPress Post Revisions

<pats self on back>

OK, with that said, I finally found this great SQL query for deleting old WordPress draft revisions.

What this means to Tripawds Bloggers

You may have noticed the Save Draft button in your Tripawds Blog post editor. This will do just that – save a current working draft of your post. Actually doing so, however, is unnecessary considering WordPress has it’s own auto-save function built right in. But if you are writing an important post and concerned about losing your work, go ahead and save your drafts. I am no longer concerned about database bloat!

Scroll down beneath your post editor after saving a draft and you will notice a section called Post Revisions. Clicking the link there will allow you to review the latest draft you saved, compare it to the most recent auto-save, and restore whichever one you prefer.

Why only one revision, and How?

Anyone familiar with WordPress may wonder why only one revision shows, no matter how many times the post is saved. Those very familiar might be asking how we did that.

Every saved post revision is stored in the WordPress database. Over time, especially in a WordPress MU environment, and particularly with users who tend to frequently save drafts, this can create excessive unnecessary database entries – said bloat I eluded to earlier. By limiting revisions to one draft, we are still allowing members to save important drafts and compare that draft with the current auto-save, while keeping unnecessary entries out of the database. FYI: Every draft manually saved will replace the most recent revision.

How did we do it? We are running the Limit Post Revisions WordPress MU plugin from the wpmudev.org project repository. I know, I know, limiting post revisions will not delete old drafts from the database, and that’s what truly enquiring minds want to know. We’re getting to that.

Limit Post Revisions WPMU Plugin Site Admin OptionWhat use this is for WPMU Site Administrators

Limiting post revisions can also be done with this simple hack to your wp-config file, immediately following the db_collate definition, as in…

/** The Database Collate type. Don't change this if in doubt. */
define('DB_COLLATE', '');

/** Number of saved revisions; false acts as 0 */
define('WP_POST_REVISIONS', 1);

But I like to avoid editing core files whenever possible, and much prefer to use awesome WPMU plugins. But I digress, back to the task at hand – how to delete all those old revisions in the MySQL database driving your WordPress installation…

Here is the query I used, edited for use with WordPress MU:

DELETE a,b,c
FROM wp_{id}_posts a
LEFT JOIN wp_{id}_term_relationships b ON (a.ID = b.object_id)
LEFT JOIN wp_{id}_postmeta c ON (a.ID = c.post_id)
WHERE a.post_type = 'revision'

Simply replace {id} with the id for the blog on which you want to delete old post revisions. Backup your database first! To be safe, I also exported copies of the affected tables so I could restore them quickly if anything broke. But nothing did, at least not that I can tell, yet. 😉

In our case, I reduced file size of our wp_1_posts export from more than 11 MB to less than 2MB! Please note, this worked for me. No promises, and good luck!

Many thanks to Andrei for providing this query, and explaining how it will remove related entries from the postmeta and term_relationship (i.e.: tags, categories, etc.) tables. I found many references to the following query for deleting post revisions, but Andrei’s solution gave me the confidence that all unnecessary data would be deleted from the database.

DELETE FROM wp_posts WHERE post_type = "revision";

While we’re at it, for anyone looking to delete all old post revisions from a basic WordPress install, here ya go…

DELETE a,b,c
FROM wp_posts a
LEFT JOIN wp_term_relationships b ON (a.ID = b.object_id)
LEFT JOIN wp_postmeta c ON (a.ID = c.post_id)
WHERE a.post_type = 'revision'

Hope this helps someone, as much as it helped me!

We have a blog ring now.

Wanna see a random Tripawds Blog?

Every Tripawds Blog is now linked together in a true Blogger style Ring of Blogs. Users can now stumble upon another totally random three legged dog blog by following the links now found site-wide here at Tripawds. Each Tripawds Blog now has a common navigation strip, something like this…

» RANDOM TRIPAWDS BLOG » FORUMS » CHAT » DIRECTORY » JERRY’S BLOG »

By clicking the RANDOM TRIPAWDS BLOG link, you will be taken to the next RANDOM TRIPAWDS BLOG which has the same strip for visiting the next RANDOM TRIPAWDS BLOG, and so on, and so on.

For those wondering just who might be blogging about their dogs here, this is a easy way to discover what you’re missing. The top 100 active Tripawds Blogs are always listed on the directory page, but cruising the blogs this way should be more fun. We hope you enjoy it.

The only problem I see so far, is that many Tripawds members create a blog upon signup, but never actually start blogging. 🙁

So why not drop on comment on those blogs to let them know what they are missing? The more stories we can share here, the better a resource this community becomes for those facing cancer or amputation with their dogs.

So, how did I do this?

For anyone interested, I implemented this Blogger style blog ring for WorPress MU using these two free plugins available from the WPMUDev.org project repository:

WPMU Footer HTML
This WPMU Plugin enables you to insert any HTML into the footer of all blogs posted within a single WPMU install. With a little hacking, it will place inserts in the header too. Sure, it’s takes a little hardcode effort to customize, but for a CSS neophyte like me it just worked better than Global Header which had the sweet Admin interface I preferred.

WPMU Random Blog Redirect
This mu-plugin allowed me to create a global link to http://tripawds.com/?random which will redirect readers to a random Tripawds blog, in classic StumbleUpon-like fashion.

I am always cautious about installing old WPMU plugins, especially those that appear to be no longer maintained or supported. I much prefer to install the plug and play plugins available with our WPMU Dev Premium membership. But I wanted to make this specific functionality work, and I carefully tested things first on our development installation.

This version of Random Blog may be two years old, but it is apparently working fine. And since the discussion about WPMU Footer that helped me get it working seems to have disappeared into the ether, I’ll share how to ad header inserts in this global footer plugin…

First, I’m using v. 1.0 since v. 1.1 had some issues with the header inserts, which I just added right before the final php function:

add_action(‘wp_head’,’jas_wpmu_css_footer’)

Correct, the header insert code goes after that for the footer. Whatever, it works for me! No promises for anyone else. 😉

But your saying Jim, banner ads are in the header too? Using the WPMU Dev Premium Supporter plugin, we are able to automatically remove banner ads from all blogs while keeping the community navigation strip. I did this by wrapping the ad code within an optional Supporter script and placing HTML for the navigation after that.

Hope this helps clear up any questions about the new Random Tripawds Blogs navigation strip, and how it got there.

UPDATE: Download WPMU Footer HTML v.1 here.

Supporters Demystified

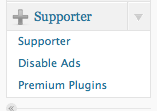
wpmu premium supporter wordpress menu tabTripawds community members may have some questions about the enhanced features enabled for Supporter blogs. WordPress MU site administrators might be interested in how the upgrade function works.

I hope to shed some light here on all of the above. So, let’s talk about Tripawds Supporters and the WPMU Dev Premium Supporter plugin.

As a reminder, all free Tripawds Blogs include basic comment spam protection – using the TypePad anti-spam plugin – and 25MB of upload space for storing photos. Free blogs also show banner ads at the top and bottom of every page. The Supporter mu-plugin allows us to automatically increase a Supporter’s upload quota to 1GB and turn on enhanced blog features by activating additional plugins on that blog. It also immediately removes the banner ads from upgraded blogs, and allows Supporters to turn off ads on other Tripawds blogs. Best of all this is all done automatically upon upgrade, which can be done via single payment or recurring subscription.

I would like to think I was at least a little helpful in identifying certain issues with the new Supporter v. 2.0, but I can take absolutely no credit for the amazing development work and quick update release. We are now running Supporter v. 2.0.2 and I am happy to say it’s new features are impressive. How does it work? The mu-plugin includes various files, some required, others optional, all of which are simple to install if you can follow the clear instructions. Let’s take one feature at a time…

Hiding Ads on Supporter Blogs

For Site Administrators: a small snippet of code is used in conjunction with an optional component (supporter-ads.php) to show or hide whatever text you want, wherever you want. We use it to hide Google ads in the header and footer of Supporter blogs. Simply wrap the AdSense HTML within this snippet where indicated, and it will only display if the the blog is not a Supporter. The exact opposite can be done with a different bit of code, showing any desired text only on Supporter blogs. There are also admin settings for the number of blogs – from 0  to 100 – on which ads that can be disabled by Supporters.

For Tripawds Members: There is no need to anything to remove ads from your blog, other than upgrade to Supporter status via the Supporter tab in your blog dashboard. Ads will immediately disappear upon upgrade. An added plus for Supporters is the ability to turn off ads from displaying on up to 10 of their favorite other Tripawds blogs. After becoming a Supporter, simply visit your Blog Dashboard -> Supporter -> Disable Ads. Simply follow the instructions there to search for blogs on which you wish to turn off the ads. Add them to your list, and you will no longer see ads when visiting those blogs.

Activating Premium Pugins

For Site Administrators: The new Supporter admin menu now includes plugin management features very similar to the free WPMU Plugin Manager mu-plugin. No surprise really, considering it was built by the same developer. Many kudos to Aaron for adding functionality for admins to enable plugins on non-supporter blogs. But using the Premium Plugins menu, admins can simply select which plugins they want Supporters to have, with the following options:

  • None: Plugin is available for activation by site admins only
  • Anyone: Plugin can be activated by any member blog
  • Supporters: Plugin is only available on Supporter blog
  • Supporters (Auto-Activate): Plugin is automatically activated on Supporter blogs upon upgrade

For Tripawds Members: For non-supporters, the Blog Dashboard -> Plugins tab will show the TypePad Anti-Spam plugin, which should be activated if it is not already. This will help reduce the spam comments received through your blog. There will also be a list other plugins available upon Supporter upgrade. Here is a rundown of the plugins we currently offer Supporters, and their status upon upgrade:

  • WP-SpamFree (Auto Activated): This powerful anti-spam plugin will virtually eliminate comment spam. Includes a spam-free contact form that can be easily added to your blog. Visit plugin website
  • Viper’s Video Quicktags (Auto Activated): Easily embed videos from various video websites such as YouTube, DailyMotion, and Vimeo into your posts. Visit plugin website
  • Subscribe To Comments (Auto Activated): Allows readers to receive notifications of new comments that are posted to an entry after they have commented on the post. Visit plugin site
  • All In One SEO Pack (Requires Activation): Comprehensive Search Engine Optimization options for your blog. Visit plugin website

Offering Premium Themes for Supporters

For Site Administrators: Much like Premium Plugins, the new version of Supporter now allows site admins to make certain blog themes only available to supporters. All members would be able to preview how their blog looks in the Premium theme, but they would be presented with a message about upgrading upon an attempt to activate it.

For Tripawds Members: We have not yet implemented Premium Themes as we are still seeking feedback about which themes might be considered, well … premium! We offer more than 100 blog themes and in all honesty have only tried out a handful. A whole bunch of new themes are in the works so stay tuned.

What does it cost?

For Site Administrators: All of the WPMU Dev Premium plugins, themes, videos, and support are included with a WPMU Dev Premium membership subscription. Site admins can set the price for Supporter upgrades for one, three, and twelve month subscriptions or for the single payment method. An option for setting the number of free days blogs have with Supporter features is also available. The new Supporter sign-up page even includes daily cost calculations to show members what they can save by upgrading for longer periods.

For Tripawds Members: A Tripawds Supporter blog upgrade subscription costs only $25 a year. A one month subscription costs $5, and we offer three months for $10, so savings are clearly realized with the annual option. We chose the subscription method (over single payment) since Supporter features are automatically disabled upon the expiration date. We don’t want any members getting surprised by deactivated plugins, so we went with the automatic renewal.

NOTE: Be sure to cancel your PayPal subscription before it expires if you do not want to pay for another year of enhanced blog features!

Believe it or not, this just brushes the surface of all the new features available in Supporter 2.0, but hopefully it explains a few things for our members. We would love to hear your feedback, so please leave a comment below. Or, feel free to ask any questions in the Tripawds Technical Support discussion forum. We’re especially interested in what Tripawds members think about the subscription vs. single payment method for Supporter upgrades, and whether anyone is interested in using the new optional Amazon payment gateway.

For the record, as of today there are eight active Tripawds Supporter blogs. With nearly a thousand members, and operational expenses in the thousands of dollars, please don’t think we actually making money here. We offer plenty of tips to make the most of free Tripawds Blogs, and use these Supporter features to thank those members who generously show their support.

WordPress MU Upgrade Complete

We have just completed the maintenance upgrade of all Tripawds Blogs to WordPress MU 2.8.5.2. Thank you for your patience!

This update addresses various administrative bugs and security fixes. If you experience any technical difficulties or unexpected anomalies, please report them in the Tripawds Technical Support discussion forum.

Sometimes it feels lie we are always tinkering behind the scenes and upgrading things around here. But after the ordeal we went through making a major version leap earlier this year, it’s the least we can do to keep things operating smoothly around here for all our members. Thank you all for your continued support.

Upgrading core files for the Tripawds Blogs community is always nerve-wracking. But I actually find it easier than upgrading our regular WordPress blog. Perhaps just because between this site and the RVblogz free travel blog community, I just have more practice. But the steps for upgrading WPMU are pretty simple. It’s just the need to follow them exactly, and the potential for data loss if you don’t that greys my hair. As if it isn’t grey enough already! 🙂

Quick Fix for WordPress Trackback DoS Exploit

One thing about the WordPress development community, is that they are on top of things when it comes to potential exploits of the system. Just this morning there were numerous reports of Denial of Service (DoS) attacks upon hosted WordPress websites and WPMU blog communities, like this one. Steve Fortuna quickly posted a fix. Within minutes I found the detailed WordPress DoS Attack Script Solutions described in the HashBangCode blog and implemented them on all our sites. The last thing we need is another mysterious server load spike bringing down the Tripawds server.

For anyone interested, and daring enough to follow my directions — note this blog’s tagline — the fix is relatively simple:

Just insert the following to your wp-trackback.php file at line 47:

// DoS attack fix.
if ( strlen($charset) > 50 ) {
die;
}

The HashBangCode blog goes one step further and recommends adding the following at line 57 (assuming you added the above already):

// DoS attack fix.
if ( strlen($title) > 200 ) {
die;
}

For those who may be uncomfortable with editing core files, this plugin stops WordPress trackback DoS attacks.

I understand this all may mean absolutely nothing to Tripawds Bloggers, except to know that we too are on top of things when it comes to keeping Tripawds Blogs Community up and running. But I figure the faster news of fixes like this can be spread, the more likely we are to stop spammers and hackers in their tracks.


125x125-banner.png
Many thanks to drmike for first bringing this to my attention in the WPMU DEV Premium discussion forums. Yet another reason we are happy with our WPMU DEV Premium membership!

Behind the Scenes is brought to you by Tripawds.
HOME » NEWS » BLOGS » FORUMS » CHAT » YOUR PRIVACY » RANDOM BLOG