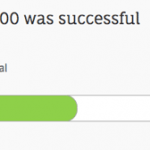
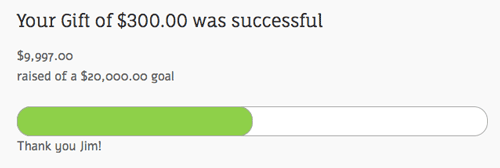
This put us very close to raising $10,000. Who will be the one to put us over the half-way mark of our goal for the year?
Why Support Tripawds?
The Tripawds 501c3 Foundation was formed with one goal: To help amputee pets and their people everywhere.
We have given thousands of dollars to help concerned pet parents, and provided reimbursement for rehabilitation services by certified practitioners. The Maggie Moo Fund for Tripawd Rehabwas is a trial program. It was initially funded to grant five applications. Cosmo was the fifth. Watch for next week’s Foundation Friday blog post for complete details.
Simply put, however, donations have slowed down and I want to see this program fund more sessions to help many more Tripawds stay fit and strong. Thanks to Greyhounds Rock, we will be able to issue five more grants. So please spread the word!
But the Foundation has many more expenses to cover:
We have more direct assistance programs planned too, and we can’t do them without your help.
If you have found the Blogs, Forums, Live Chat and many other free resources here helpful, please consider a charitable contribution to help keep your Tripawds community online and fund future programs. Together we can help Tripawds and their people in many more ways for years to come!
After getting absolutely nowhere with Verizon Wireless technical “support” for two months, spending hours on the phone with reps who knew less about Internet Protocol than I do—which is pretty pathetic—and tearing half my hair out, I believe the problem with Verizon Wireless users having difficulty accessing the Tripawds Blogs and Forums has finally been resolved, once and for all. At least so far…
We’ve been using our Verizon Mifi to successfully manage Tripawds and the other websites we host for about a week now, which has been impossible to do for the last couple months due to packet loss I identified using traceroutes from our server. Don’t worry, I’m not going to get all technical again. Pardon my French, but this shit is above my pay grade, and the debacle deserves at least a little cussing.
Never mind what I feel like telling all those “techs” who insisted it was a “problem with our site,” or that our “IP address is bad.”
Instead, I’d prefer to put this behind us, and hop on. Thank you Jerry for teaching me to Be More Dog.
What happened and how did we fix it?
After making a stink on social media, I thought I was finally getting the attention of somepawdy at Verizon who could help. Apparently not.
Only after escalating the issue to Executive Management did I speak with someone who, “sincerely wanted to help get this fixed.” I discovered how to contact your Regional Verizon Wireless President, and didn’t expect to hear back from him directly, if at all. So I didn’t get my hopes when the woman I spoke with acted very diplomatic and promised to put me in touch with a network engineer. The next day, however, I was elated after receiving a call from a network tech at their Technical Advisory Group who actually admitted there was clearly a problem and promised to get to the bottom of it.
To make a long story short, I spent the next week on the phone working directly with a number of technicians who worked their magic while running live trace reports on my device while connected to our server. They identified a problem with packet/data optimization Verizon performs that was not working properly for certain network traffic. Lucky us!
They also apologized for the prior lack of support I had received, and we had a good laugh at some of the responses I was given during my many previous pleas for help.
This whole ordeal would be funny, if it wasn’t our sites, and Tripawds users who were being affected. If you use a Verizon Wireless device to access Tripawds—and you can read this—please let us know if you’re still having any trouble. If you know any other members who may have given up in frustration, please tell them to try again.
And if you appreciate the efforts and persistence that went into getting this resolved, please consider Supporting Tripawds! Had I given up, I’m certain the problem would remain today.
If my last post seemed a bit technical, that was my point. It apparently got the right people interested, and provided enough information to help pinpoint the problem.*
But fear not! This post will quickly and simply explain how you may be able help get this problem fixed, for good.
How To Help Fix Verizon Network Packet Loss for Tripawds Users
If you are a Verizon Wireless customer, and you have trouble loading pages on the Tripawds website, or logging in to your blog, please help us help Verizon Wireless techs fix this issue by doing the following:
Confirm these symptoms when connected to the internet using your Verizon Wireless device:
If possible, please include telephone number of your Verizon Wireless device
Thank you! Your help is greatly appreciated.
Sadly, I understand that the Verizon Wireless customers this may affect most, might not be able to even read this. Or they may have given up on visiting the Tripawds community weeks ago. Please pass along this information to any members you may know who might have had trouble.
But this can’t be just us! My discussion with our Solutions Advisor confirmed that it isn’t only traffic to our server’s IP address that is getting dropped. It is clearly a block of addresses which means there are certainly other users and/or servers being affected. If you found this post in a desperate attempt to find a resolution, please complete the steps above AND include the IP address of the server you are/were trying to reach, and its physical location, if known.
*And Now for a Bit More Technical Info…
I was right: My mtr reports, ping results, and other network analysis proved that packets are indeed being dropped at a specific node on the Verizon Wireless network. So much for all those “support” reps insisting it was a “problem with the site” for the past six weeks.
I was wrong: The data loss is not being caused by intentional ICMP Rate throttling as I first presumed. So I guess I can’t cry “Net Neutrality!” as I was about to start doing.
ICMP Rate limiting — Throttling is a common practice by network providers used to reduce traffic congestion which prioritizes “more important” traffic.
A Misconfigured ISP Router — If a router on the route packets take is incorrectly configured your packets may never reach their destination.
It was our Data Center who first suggested the ICMP throttling. And silly me, I expected Tier 1 Networks like Level3 and Verizon to ensure their equipment handles all traffic effectively. Our Solutions Advisor reassures me that “this isn’t even throttling,” instead telling me that, “something is broken.”
Finally! 🙄
What Now?
Unfortunately, these things are complicated and may take time to resolve. To complicate matters further, even all of the data passed to every server at our data center could be considered a spec in the universe of internet traffic Level3 delivers. It’s not like we’re Comcast with hundreds of thousands of users complaining because they can’t watch the last episode of Mad Men.
We are but a few thousand users with a couple hundred blogs, about three legged cats and dogs.
I’m not getting my hopes up too high, yet. But at least I have someone who has promised to get to the bottom of this.
One more thing…
I just want to scream at all those support reps who insisted our “site is broken” on so may calls over the past month, I Told You! I know that won’t do any good, but it feels good knowing all of my efforts to escalate this issue have finally resulted in reaching someone who understands.
Before hearing from the Advisor, we finally resorted to purchasing another mobile hotspot device to confirm my theory about the problem being with the network, and not the site, nor the server. Yesterday morning I was totally ready to start asking Verizon Wireless to explain this…
Let’s hope we don’t have to go there, ever again. Please send us you IP address if you have been affected and use the social network buttons below to share this so we can hopefully reach anyone else experiencing the support nightmare I have been living for weeks now.
Please stay tuned for updates, or post in the this forum topic if you care to discuss further!
Verizon Wireless customers are having trouble accessing the Tripawds community, and VZW tech support fails to acknowledge the network routing issue causing problems. This has been going on for weeks and more than six hours on the phone with call center reps has only resulted in a total customer service failure by Verizon, continued frustration for users, and major stress headaches for me.
Tripawds members need to know that we have been doing our best to get this issue fixed, so I will explain what’s going on and how hard I’ve been trying get help from Verizon network engineers. Besides, such an epic Verizon support failure needs to be shared, if not solely for its entertainment value, then to document what I have discovered in case I ever reach anyone at Verizon who cares, or is able to help.
What Can’t I access My Server via Verizon Wireless Network?
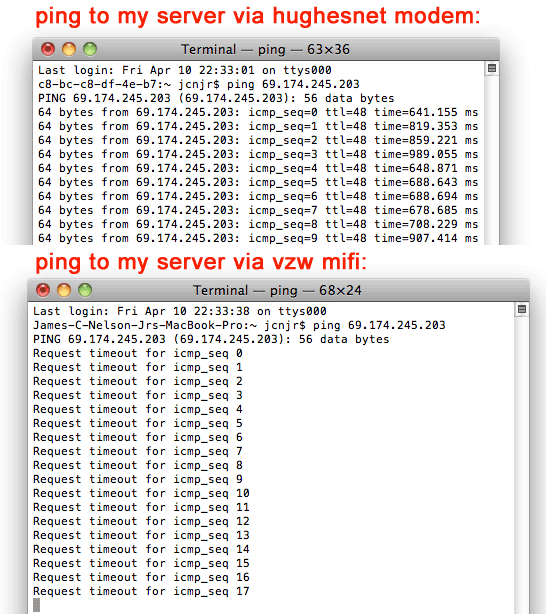
I first noticed issues connecting to the server which hosts the Tripawds blogs and forums when using our Verizon MiFi wireless hotspot on or around March 21, 2015. We were in a remote area at the time, so I presumed that was the reason and continued to work effectively on the Tripawds site by using our HughesNet satellite internet connection. After relocating four times across three states over four days, I was still unable to access our site using the Verizon MiFi, when I had no trouble doing so via HughesNet.
I could use the MiFi to easily browse other websites. Only when attempting to connect to our site, did the Verizon connection timeout. Meanwhile, certain Tripawds members who also happen to be Verizon customers started reporting similar issues.
Thinking there might be a problem with the server, I opened a support ticket with our data center at Peer 1 where we manage our own dedicated server. They were the first to identify serious data loss on the VZW network, prohibiting certain Verizon customers from being able to use our website…
“I did a mtr from your server’s gateway to the destination ip 70.196.205.9 and I am seeing packet loss on verizon’s end (hop 9). If you want us to send an email to Verizon; we could. However please note that since we are not directly peered or their customer, there’s a high possibility that they will not respond back to our email. Please can you ask your client to open a ticket with Verizon regarding the packet lost.” —Peer1 Network Analyst
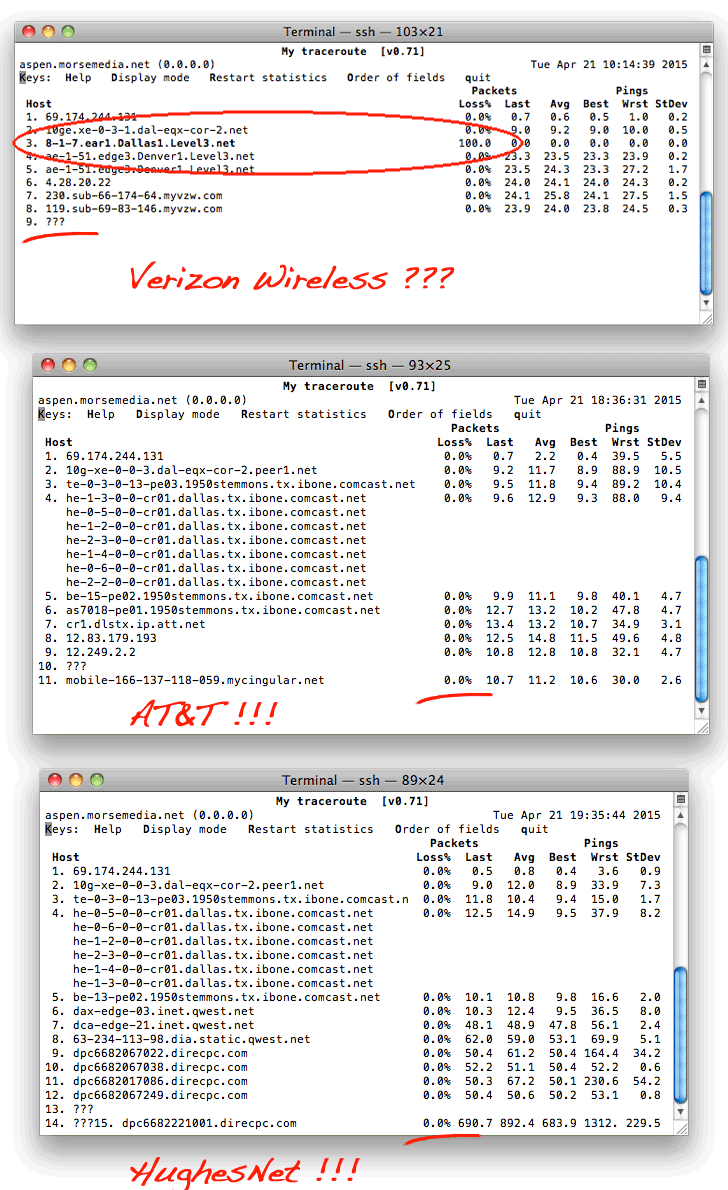
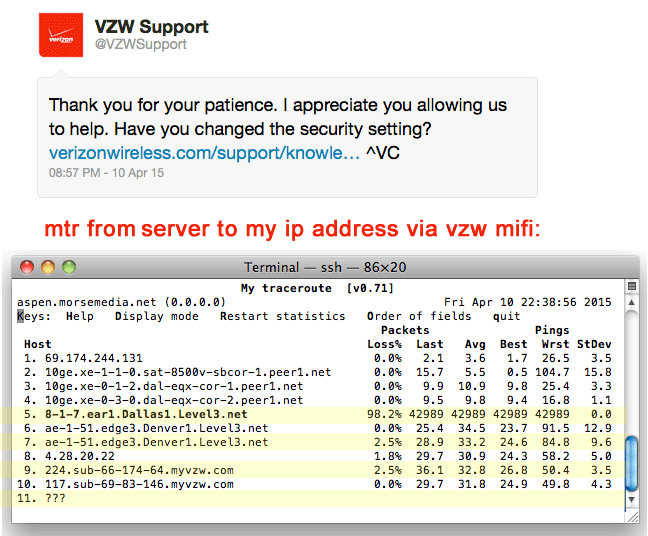
My Traceroute Results from Server to Verizon MiFi
I’ll be the first to admit that I have a fairly novice understanding of network routing. But let me explain what this means to anyone less technical than I, like the Verizon tech support reps I have been dealing with for instance.
What does mtr mean and what does it do?
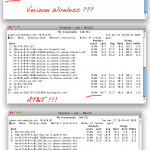
The “mtr” stands for My Traceroute. This is a network diagnostics tool run via command line interface, in this case from our server which has a specific IP address on the internet. The results above show nearly 50% packet loss at a hop on the myvzw.com network backbone. Note how the pings (shown at left) never reach me, or my IP address at the time when using my Verizon MiFi.
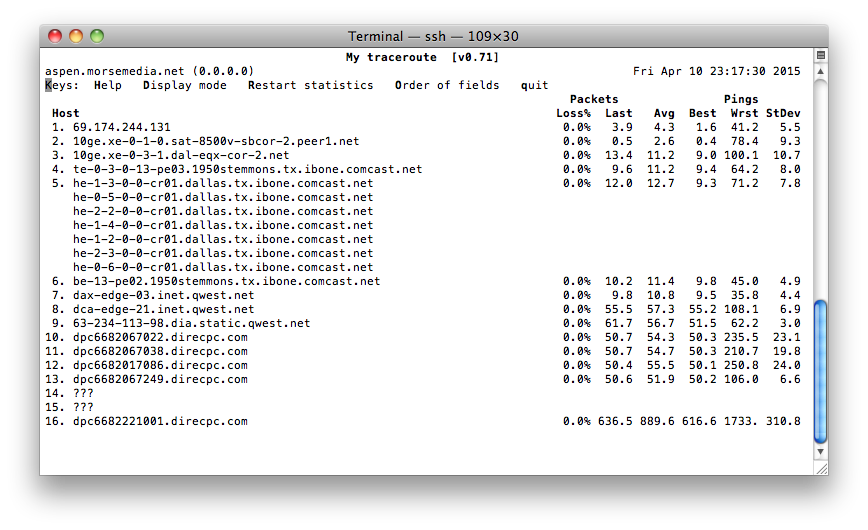
Compare that to these results from an mtr I personally ran from our server to my IP address when connected via our HughesNet internet connection…
MTR results from server to my HughesNet ip address
No packet loss, and that last line is my IP address, clearly proving that the connectivity problem is specific to the Verizon network, not a problem with our server. Thus began my journey through tech support hell with Verizon call reps, where the frustration continues.
Before I get into the hilarity that ensued when trying to get help from Verizon support, I’ll share further diagnostic measures we took to confirm this was not an issue with our website, the server, or my MiFi device.
First, I wanted to confirm this same issue was the reason other Tripawds members were also having trouble. So I asked those reporting problems, who also use Verizon Wireless, to provide their IP address…
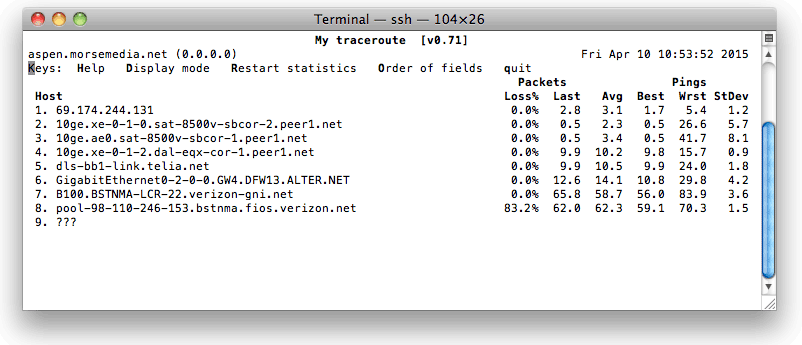
mtr results from server to Massachusetts Verizon IP address
Surprise! This member in Massachusetts uses Verizon and is unable to connect to Tripawds.
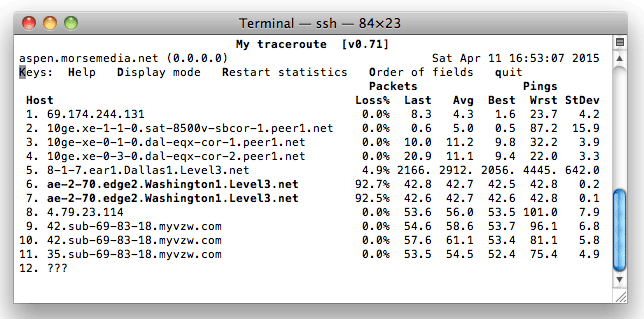
Data loss on Level 3 network for VA Verizon user.
And, this member in Virgina is continually having trouble navigating the forums or posting in the chat room.
So, you may be asking, “Wait Jim, what’s that ‘Level3’ all about? I thought you were blaming this on Verizon.” Well yeah, I am. A supervisor actually mentioned being unable to ping our server from “Level 3” after one of my lengthy support calls, and repeated representative escalations. Well, duh! That’s exactly what I’ve been reporting for the past few weeks now.
Besides, if Level3 is not a Verizon network, they are directly peered to it, and I am a customer of Verizon, not Level 3! But I digress.
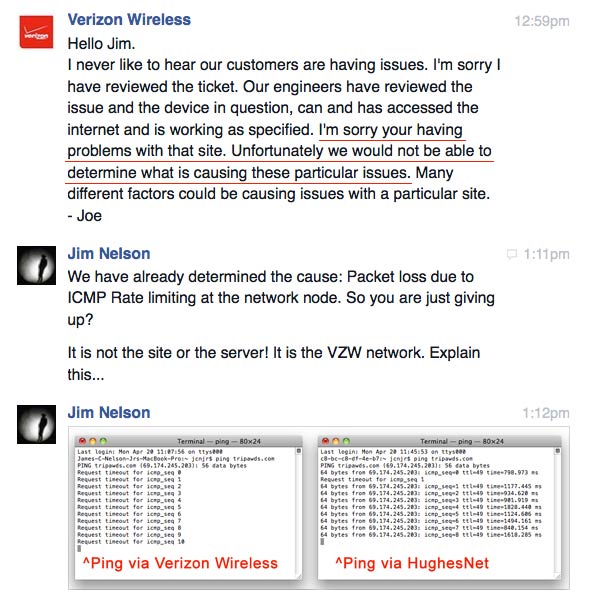
Uhh… what’s a ping?
I continued to troubleshoot this issue by “pinging” our server from both networks I have available for accessing the web. The “ping” is a simple shell command often used for network diagnostics to determine if a certain point on the internet can be reached from your connection. In our case, I pinged the Tripawds server from both our Verizon MiFi and HughesNet modem. Here’s what I found…
Comparison of server ping results via different networks.
Notice how I have no problem communicating with our server via our HughesNet connection. That is our server quickly responding to confirm each ping was received. When attempting to do the same via our Verizon MiFi, each ping request merely times out. Sigh…
At this point, over a week ago, I had consulted with our data center, my server manager, and a number of internet experts and very technically adept friends. We all agreed that the problem lies in the network, there is no problem with my server or website configuration. And my MiFi is working fine.
So, about that “entertainment factor” I referred to earlier…
Does anyone at Verizon Support Understand Networking?
This support debacle is not just funny, it is pathetic. It might be amusing, if it wasn’t my server, and my customers who are are being impacted by the problem. I just can’t believe that I know more than every Verizon tech support supervisor I have spoken with. The following are just a few highlights from the hours I have spent escalating calls only to have two support tickets closed with unacceptable resolution.
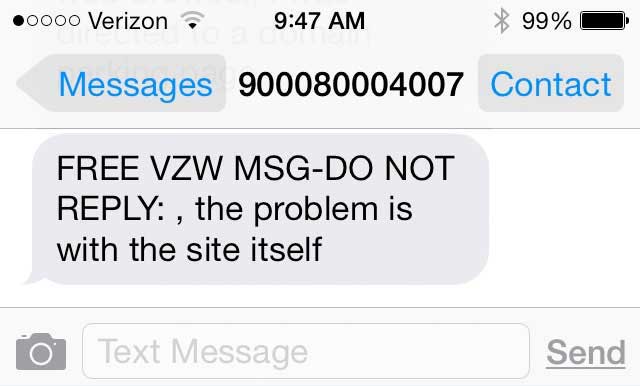
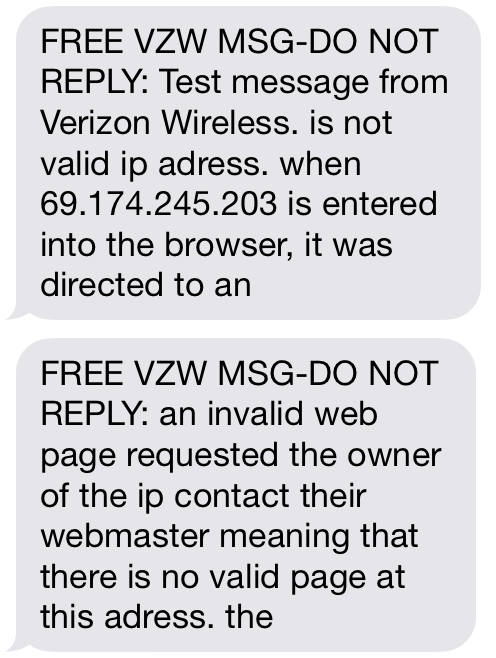
This is a text message I received from Verizon after a supervisor told me the issue had been “resolved” followed by a screenshot of what I had spent more than an hour explaining to various reps. Why a text? Yeah, that’s funny in itself. A rep at the Verizon call center in Idaho told me they do not have email. Yes, an internet support center that cannot email. But wait, it gets funnier. The rep also told me they do not even use Verizon services at their location!
Frustrated, I had to call back and find out how they could possibly come up with this “resolution” for the issue I’ve reported and explained in detail multiple times. Get this: after another couple hours speaking with various reps, and their supervisors, Verizon told me “your IP address is bad.”
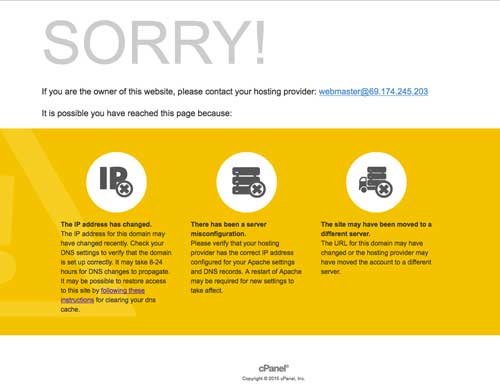
Funny Thing 1: Verizon Support closes both of my tickets, after determining my IP address is invalid by entering the address into a web browser and getting a page that says website unavailable. 😕
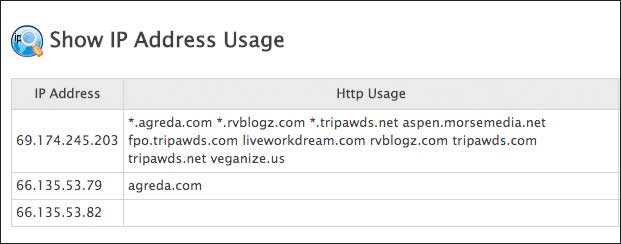
Anyone with a basic understanding of Internet Protocol or server management knows that this page actually proves the IP address is valid and the server is doing its job. We have multiple websites and 1,000+ subdomains configured at this IP address. How would a server know which one the user wants to visit? Here is further proof that our server is configured properly, with multiple domains at the IP address.
Enough said. Back to Verizon’s supposed “resolution” to our problem…
Funny Thing 2: Not being able to ping the IP address via the Level 3 network? That is exactly my point!
Funny Thing 3: I was never notified that either of my support request tickets had been “resolved” even after speaking with one supervisor who actually sounded like she may be able to help by discussing the problems with engineering. She promised that I would receive a text message allowing me to communicate with her directly, bypassing the multiple timely escalation requests every time I called.
She downright lied, or doesn’t even know how her own support system works, because when I replied the message, it came right back to me.
Funny Thing 4: I call back to express my concerns once more, and explain the problems all over again. I press the option for “tech support” so I can speak with a human. Seriously, after 20+ minutes on the phone with a rep who clearly had no clue what I was talking about, I am told, “OK, let me connect you with technical support.”
“I thought this was tech support!” I say
“No, this is customer service,” she says. Service? Not!
Various Funny Things: I did my best to remain calm, but after a few calls, I knew the drill. I would begin each call by screening the support rep to see if they know what I was talking about.
After trying to explain to one rep that this was not a problem with my device, but a network backbone routing issue, I was transferred and told…
“Please hold, we’ll be happy to help you get your backphone working.”
Another time, after clearly describing the packet loss at a hop on the Verizon network, the rep said
“I’m sorry to hear about your package loss, let me transfer you to someone who can help with that.”
Still, no help. So I turned to social media…
Apparently Verizon handles calm requests for help on Facebook by deleting posts to their page, without reply.
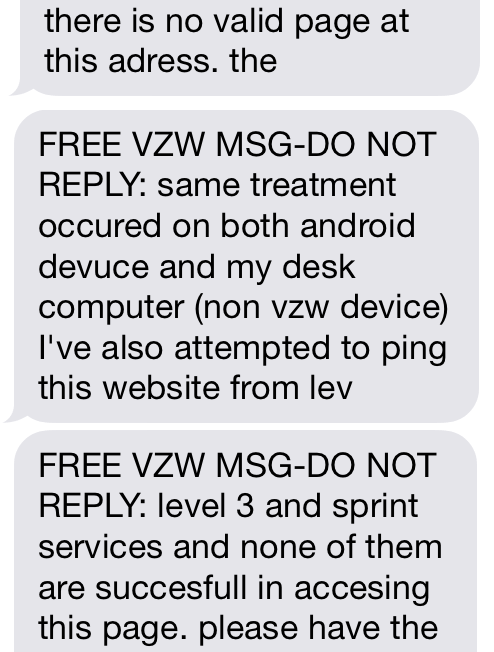
On Twitter @VerizonSupport was actually quite responsive with a reply suggesting I follow and send a direct message. We replied back and forth via private messages immediately. Great! or so I thought…Sigh…hoping @VZWSupport might be as responsive, I send various messages and screenshots. It’s not easy describing such technical issues in 140 characters or less, but I was polite and clear providing as much detail as possible. After waiting almost 48 hours, I get this reply to my message with a screenshot clearly showing network data loss…
Seriously? Security setting? On who’s device? This is not just my problem! It is with Verizon users all over the country. I’ve asked them to clarify “security setting” since there are no IP blocks on our server for Verizon users. Could Verizon be blocking the IP on their end? I have yet to hear a reply.
Another Funny Thing: The link they sent me is for instructions about how to use my MiFi and reset its admin password.
So here we are, weeks later with nobody willing or able to help.
Where is my Support Hero?
Please, somebody. Tell me I’m wrong. I would love for someone to tell me what’s going on and how I can fix it. That person clearly doesn’t work in technical support at Verizon. I have been told, “reporting this issue again will not help” and that I need to contact my web host. They even kindly told me who that was, as if I didn’t know!
If you know anybody at Verizon who may be able to help, please forward the link to this post!
If you can help, please leave a comment with any suggestions.
If you agree with anything I’ve said, or have had similar experiences dealing with Verizon please share this link.
And if you are a Tripawds member, please know that we’re trying desperately to et this issue resolved. Sadly, if you’re experiencing this issue, you likely won’t be able to read this. 🙁
UPDATE: April 20, 2015
Big surprise. Verizon Wireless has now closed the third support ticket about this issue, insisting that is is still “a problem with the site.”
Furthermore, we have received confirmation from network analysts that the packet loss we have identified at VZW network hops is being caused by ICMP throttling at the network nodes.
ICMP Rate Limiting is a common practice to alleviate network congestion by prioritizing “more important” traffic. How do I explain to Tripawds users that their beloved pets are not important enough for anyone at VZW support to help?
UPDATE: May 10, 2015
Finally. After getting nowhere with Verizon Wireless technical “support” for nearly two months I believe this problem has actually been resolved! At least so far…After I escalated the issue to Executive Management, I was able to work directly with network techs who actually understood me, and identified a problem with packet optimization that wasn’t working properly for everybody. Persistence pays off!
For quite some time now—a few years, in fact—we’ve been working feverishly behind the scenes here at Tripawds on the third major overhaul to the News Blog and discussion forums since Jerry first inspired us to start this site. If all goes as planned, things will soon look a lot different, be more stable, and work much better on all devices.
Nothing is required on your part, other than your patience during this long awaited transition. We have a select team of Tripawds members helping to ensure the new site is ready for prime time. Consider this fair warning a heads up that one day in the coming weeks the site may be unavailable for a while. We will do our absolute best to keep downtime to a minimum.
NOTE: All Featured Blogs and Member Blogs will remain accessible during the makeover! Only the main site and forums will be affected.
The Shape Of Things to Come
For the first time ever, Tripawds is being re-branded. We are retiring the original logo inspired by Jerry, and replacing it with a badge of honor that represents the power of three paws—for both dogs, and cats!
A Sneak Preview
Clarity, performance, and functionality on all devices are the primary purposes for this overhaul. The new design is faster, cleaner and mobile friendly.
We will still feature random Tripawd Angels on certain pages. The home page is being trimmed down to quickly and more easily direct new members to the most helpful resources. And site menus are being restructured to help users easily navigate the vast resources available.
Most content will remain the same, but we do have a few surprises in store. The major difference will be how information is presented, but we promise the change will not be too drastic. Familiar forum layout and functionality shall remain—just look and work better!
Any Questions?
Please post in this Tech Support topic with any questions or concerns. Thank you for your patience and support!
If you appreciate all the efforts that go into the incredible undertaking that this overhaul entails, please consider making a charitable contribution to the Tripawds Foundation 501c3 public charity, created to ensure this community remains online and free to use.