TRIPAWDS: Home to 23108 Members and 2159 Blogs.
HOME » NEWS » BLOGS » FORUMS » CHAT » YOUR PRIVACY » RANDOM BLOG

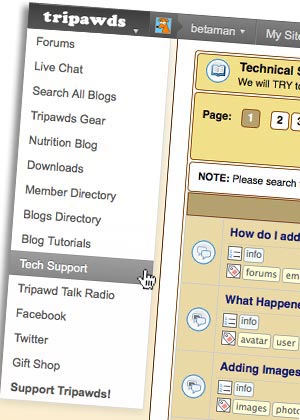
New Custom Admin Bar Menu Improves Navigation

Within minutes of announcing the new Tripawds admin bar menu in the tech support forum, one member replied…

Very niceā€¦much easier to navigate!

wordpress multisite custom admin bar menuThanks Meghan! That was our goal with implementing this new custom admin bar menu ā€“ to help users navigate the site, whether they are searching the forums, watching videos, chatting or browsing blogs.

The WordPress Admin Bar is the grey stripe visible to logged in members which includes menus with links to various user account and blog administrative tools. Now users will notice a new menu to the far left of the bar, no matter which blog they’re viewing.

Hover your mouse over “tripawds” at far left to expand the menu for easy access to some of the most popular resources this community have to offer. Don’t see the Admin Bar? Register today to take full advantage of this network!

How To Add Custom WordPress Admin Bar Menu

For WordPress multisite network administrators interested in how we did this, it’s simple with the free Custom Admin Bar Menu plugin from WPMU Dev. Sure, you could hack functions to remove or add links to the admin bar, but why bother? If you’re looking to add a whole new menu, this plugin makes it easy.

As usual, the team at WPMU Dev has created a sleek interface which allows for easy set-up and configuration. The plugin works with single WordPress sites and any multisite network.

configure wordpress multisite custom admin bar menu

Adding and sorting links is easy sort with the drag and drop interface. And you can even use a small image for the menu title (no more than 28px high). Make it transparent for best results.

TIP: Select the “External Page” URL type and include the whole address if you want to link to a certain page on a specific blog within your multisite network.

Select “Administrative Page” if you want to direct users to one of their admin tabs. And select “Site Page” if you want to include the domain.tld of the site being viewed.

WPMU DEV - The WordPress ExpertsLooking for more awesome WordPress multisite plugins? Checkout our list of all the plugins we use to power the Tripawds community or check out everything WPMU Dev has to offer!

And don’t miss my recent guest posts on ProBlogger about building an online community:

Like and Send Tripawds Posts to Facebook Friends

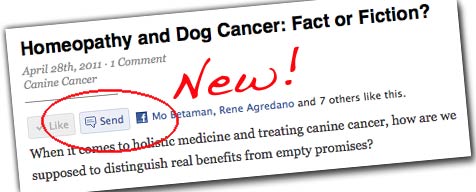
Facebook recently launched a new Send button for sharing blog posts and other web content with your friends or group members. While the well known Like button lets Facebook members share content with all their friends, the Send button allows them to select a specific friend or group of friends to share what they found.

new facebook share button for sharing blog posts with friends

Now Tripawds members and Facebook Fans ā€“ and any visitors who have a Facebook account ā€“ can now share the news about great gear, nutrition, gifts or other resources for three legged dogs with the click of a button! The new Send button can now be found on all the Tripawds Featured Blogs, and throughout Jerry’s News Blog.

Find something one of your Facebook friends may find helpful?

  1. Click the Send button.
  2. Enter your friend’s name.
  3. Add a comment. (optional)
  4. Facebook does the rest!

In fact, all Tripawds blogs using the default theme will now show the Send button on all single posts, and pages. Any members using a different theme who would like to have the button added, just let us know and we’ll see what we can do.

For those keeping score of popular posts, sending a post also counts as a “Like” so get sending those Tripawds posts to all your Facebook friends. For anyone interested in how we did this, read on…

How to add Facebook Send Button to Blog Posts

If you’re having a hard time figuring out Facebook’s Send Button instructions, don’t bother. They don’t work with WordPress anyway. The WordPress multisite gurus at WPMU Dev will likely release an awesome Facebook plugin soon, but if you can’t wait, here’s how I did it.

NOTE: Full credit is due to Ronnie at WPMU.org who wrote complete details about Using the new Facebook ā€˜Sendā€™ button with WordPress.

1. Assuming you’re comfortable editing theme files and know how, copy this entire bit of code:

<div id="fb-root"></div>
<script src="http://connect.facebook.net/en_US/all.js#xfbml=1"></script>
<fb:like href="<?php echo get_permalink(); ?>" show_faces="true" width="450" send="true">

</fb:like>

2. Depending on your theme, find the file single.php or loop-single.php and save a copy, just in case.

3. If you have plenty of time on your hands, learn all about the Loop. You don’t need to know what it does, just where it is. But I digress.

4. Paste the code above somewhere in the loop. Search for ā€œentry-contentā€ and insert the code on a new line before the <div> to show the Facebook Like and Send buttons before at the top of all your blog posts.

4b. The proper location may be determined by “the-entry” or “post-content” ā€“ again, this will depend upon your selected theme. Play with positioning and check your work.

5. Finally, you can customize how the buttons display with some attributes.

That’s it! You can see the buttons in action at the top of this post. I also added the buttons to page.php so readers can send their friends helpful pages like the Tripawds Gear Shop. And I added it to various page theme files I customized during our Tripawds makeover, so they show on the Tripawds Forums, Chat and Store pages.

I also chose to hide facebook user profile avatars from showing beneath the buttons by adding the attribute: show_faces=”false”

Adding Facebook Send Button using an iFrame

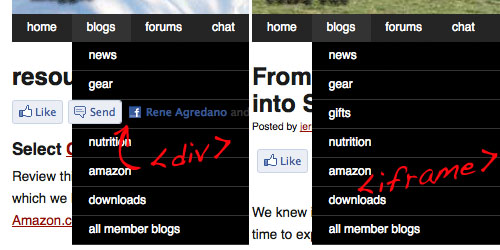
As with any coding project it seems, there is bound to be conflict somewhere. And I found it with this one upon discovering that the new Send button code provided above broke our dropdown navigation menus on the News blog.

facebook send button script breaks dropdown menu navigation iframe fix

Either the <div> or the script was causing the buttons to show through the menu, or the menu to drop down behind the buttons. However you choose to frame that, it wouldn’t work. So I fixed it with an iframe.

The WPMU Nelo Custom CMS WordPress theme from WPMU Dev that we use for the Tripawds News blog came with an integrated Facebook Like button option. I was able to fix the issue with a simple edit to the iframe by adding the attribute: send=true

Below is the iframe code we’re using on the News blog. It would get inserted in the same place as described above. (Use at your own risk.)

<iframe src="https://www.facebook.com/plugins/like.php?href=<?php echo urlencode(get_permalink($post->ID)); ?>&amp;layout=standard&amp;show_faces=false&amp;width=450&amp;action=like&amp;send=true&amp;colorscheme=light" scrolling="no" frameborder="0" allowTransparency="true" style="border:none; overflow:hidden; width:450px; height:30px"></iframe>

An Overview of the New Tripawds

We did it! The long awaited theme overhaul for Jerry’s main Tripawds News blog is complete, and the votes are in. The majority of members agree that the site is easier on the eyes with a vast performance improvement.

WordPress, Multisite and BuddyPress Plugins, Themes and Support - WPMU DEVUpcoming posts here behind the scenes will detail the various new site enhancements, but here’s a brief rundown of the new and improved Tripawds Blogs community site:

Easily implementing all these new features were only possible with our WPMU Dev Premium membership. Most noticeable, however, is the site’s new look and feel.
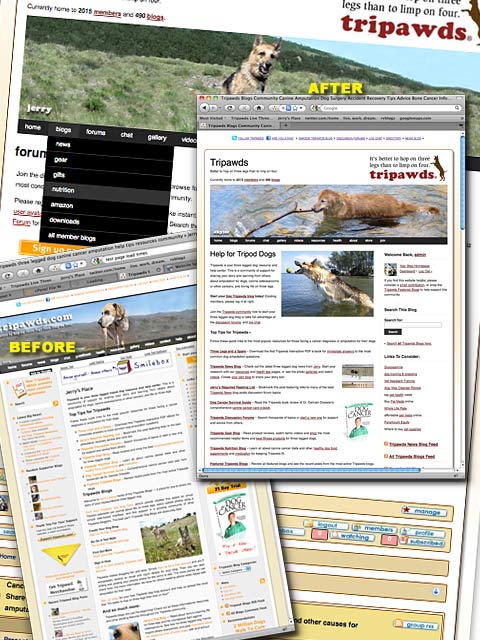
We are now running WPMU Nelo as the active theme for the main site where we maintain the News Blog, discussion forums, chat room, galleries, videos and other health tips and resources.

With the help of WPMU Dev Premium developer richie_ks, I was able to customize Nelo to meet the needs of this community. Top concerns were an easier way to navigate the vast resources available, less clutter, and above all, better performance.

This makeover was a long overdue major undertaking. Over the past four years our original theme had become bloated and outdated, seriously impacting page load times. By customizing the already slim Nelo code-base, however, we were able to enhance the user experience while vastly improving overall performance.

While it is impossible to please everyone all the time, it seems at first glance that we have achieved the primary goal of this overhaul which was to speed up the forums. We look forward to hearing your feedback with a comment below or in this Tripawds site makeover feedback topic.

Stay tuned for complete details about all the new features, and how we did it. Or, read on if you’re a WordPress multisite administrator who may be interested in how we customized the Nelo CMS theme… though this project was yet another crash course in PHP and CSS for yours truly, below are just a few hacks I’m particularly proud of.

How to Add WordPress Site Stats to Theme Header

We liked how site statistics were displayed in some other WPMU Dev themes, but that wasn’t built into Nelo. With the get_sitestats function being native to WordPress, here’s how we added it the header.php template file to show the current members and users with links to each directory on every page.

<!-- stats -->
<div><?php
$stats = get_sitestats();
echo 'Currently home to <strong>'.$stats[ 'users' ].' <a href="http://tripawds.com/members/" title="Active Tripawds Members Directory">members</a></strong> and <strong>'.$stats[ 'blogs' ].' <a href="http://tripawds.com/blogs/" title="Active Tripawds Blogs Directory">blogs</a></strong>.'; ?></div>
<!-- stats -->

Easiest way to add Random Header Images

The WPMU Nelo theme allows for custom header image upload, but Tripawds members like to see the rotating photos. After searching far and wide for a random header image solution to match my programming skills, I found this simple random header image tutorial to keep these by disabling the theme’s header image options and editing header.php with this little bit of magic…

<!-- Random Headers -->
<imgĀ  width="900" height="200" alt="Tripawds Three Legged Dog Heroes" src="https://tripawds.net/wp-content/themes/wpmu-nelo-child/headers/header_<?php echo(rand(1,24)); ?>.jpg" />
<!-- Random Headers -->

In this generated image url, the rand(x,x) echo will randomly show images titled header_x.jpg, where x is any number from 1 to 24. Name your header image files following this protocol and let the script do it’s magic.

Edit Nelo Profiles Panel for Easy Site Management

One of the best new features the Nelo Theme offers is an optional Login / Profile Panel above the sidebar. Editing the profiles.php template file will make your changes appear on every page showing the panel. And since the identified user’s name already appears as a link to his or her profile, I added a direct link to the user’s main dashboard screen.

A Bit about child themes

Finally, Nelo is constructed with a parent / child theme structure. This will facilitate future theme updates by preserving any customization edits.Ā  By editing the child-style.css file for instance, I was able to add nice rounded corners and a soft shadow to the site container, which you will see in Firefox and Safari, but not if you’re still using Internet Exploder.

Here’s what I did to properly use my customized version of nelo, while preserving edits during future updates:

  1. Upload both Parent and Child theme folders to wp-content/themes
  2. Activate child theme for site*
  3. Copy any template files from parent to child directory and make desired edits.

For complete details and ongoing theme support, I highly recommend a WPMU Dev Premium membership.

*We will not be offering Nelo as an available theme to Tripawds Bloggers, so I activated the Child theme from the Edit Site tab as Super Admin. This keeps it hidden from the Themes tab on all sub-sites.
We have a blog ring now.

Wanna see a random Tripawds Blog?

EveryĀ Tripawds Blog is now linked together in a true Blogger style Ring of Blogs. Users can now stumble upon another totally random three legged dogĀ blog by following the links now found site-wide here at Tripawds. Each Tripawds Blog now has a common navigation strip, something like this…

Ā» RANDOM TRIPAWDS BLOG Ā» FORUMS Ā» CHAT Ā» DIRECTORY Ā» JERRY’S BLOG Ā»

By clicking theĀ RANDOM TRIPAWDS BLOG link, you will be taken to the next RANDOM TRIPAWDS BLOG which has the same strip for visiting the nextĀ RANDOM TRIPAWDS BLOG, and so on, and so on.

For those wondering just who might be blogging about their dogs here, this is a easy way to discover what you’re missing. The top 100 active Tripawds Blogs are always listed on the directory page, but cruising the blogs this way should be more fun. We hope you enjoy it.

The only problem I see so far, is that many Tripawds members create a blog upon signup, but never actually start blogging. šŸ™

So why not drop on comment on those blogs to let them know what they are missing? The more stories we can share here, the better a resource this community becomes for those facing cancer or amputation with their dogs.

So, how did I do this?

For anyone interested, I implemented this Blogger style blog ring for WorPress MU using these two free plugins available from the WPMUDev.org project repository:

WPMU Footer HTML
This WPMU Plugin enables you to insert any HTML into the footer of all blogs posted within a single WPMU install. With a little hacking, it will place inserts in the header too. Sure, it’s takes a little hardcode effort to customize, but for a CSS neophyte like me it just worked better than Global Header which had the sweet Admin interface I preferred.

WPMU Random Blog Redirect
This mu-plugin allowed me to create a global link to http://tripawds.com/?random which will redirect readers to a random Tripawds blog, in classic StumbleUpon-like fashion.

I am always cautious about installing old WPMU plugins, especially those that appear to be no longer maintained or supported. I much prefer to install the plug and play plugins available with our WPMU Dev Premium membership. But I wanted to make this specific functionality work, and I carefully tested things first on our development installation.

This version of Random Blog may be two years old, but it is apparently working fine. And since the discussion about WPMU Footer that helped me get it working seems to have disappeared into the ether, I’ll share how to ad header inserts in this global footer plugin…

First, I’m using v. 1.0 since v. 1.1 had some issues with the header inserts, which I just added right before the final php function:

add_action(‘wp_head’,’jas_wpmu_css_footer’)

Correct, the header insert code goes after that for the footer. Whatever, it works for me! No promises for anyone else. šŸ˜‰

But your saying Jim, banner ads are in the header too? Using the WPMU Dev Premium Supporter plugin, we are able to automatically remove banner ads from all blogs while keeping the community navigation strip. I did this by wrapping the ad code within an optional Supporter script and placing HTML for the navigation after that.

Hope this helps clear up any questions about the new Random Tripawds Blogs navigation strip, and how it got there.

UPDATE: Download WPMU Footer HTML v.1 here.

WordPress MU Upgrade Complete

We have just completed the maintenance upgrade of all Tripawds Blogs to WordPress MU 2.8.5.2. Thank you for your patience!

This update addresses various administrative bugs and security fixes. If you experience any technical difficulties or unexpected anomalies, please report them in the Tripawds Technical Support discussion forum.

Sometimes it feels lie we are always tinkering behind the scenes and upgrading things around here. But after the ordeal we went through making a major version leap earlier this year, it’s the least we can do to keep things operating smoothly around here for all our members. Thank you all for your continued support.

Upgrading core files for the Tripawds Blogs community is always nerve-wracking. But I actually find it easier than upgrading our regular WordPress blog. Perhaps just because between this site and the RVblogz free travel blog community, I just have more practice. But the steps for upgrading WPMU are pretty simple. It’s just the need to follow them exactly, and the potential for data loss if you don’t that greys my hair. As if it isn’t grey enough already! šŸ™‚

Behind the Scenes is brought to you by Tripawds.
HOME » NEWS » BLOGS » FORUMS » CHAT » YOUR PRIVACY » RANDOM BLOG