TRIPAWDS: Home to 25110 Members and 2177 Blogs.
HOME » NEWS » BLOGS » FORUMS » CHAT » YOUR PRIVACY » RANDOM BLOG

Like and Send Tripawds Posts to Facebook Friends

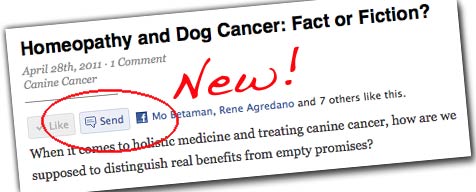
Facebook recently launched a new Send button for sharing blog posts and other web content with your friends or group members. While the well known Like button lets Facebook members share content with all their friends, the Send button allows them to select a specific friend or group of friends to share what they found.

new facebook share button for sharing blog posts with friends

Now Tripawds members and Facebook Fans – and any visitors who have a Facebook account – can now share the news about great gear, nutrition, gifts or other resources for three legged dogs with the click of a button! The new Send button can now be found on all the Tripawds Featured Blogs, and throughout Jerry’s News Blog.

Find something one of your Facebook friends may find helpful?

  1. Click the Send button.
  2. Enter your friend’s name.
  3. Add a comment. (optional)
  4. Facebook does the rest!

In fact, all Tripawds blogs using the default theme will now show the Send button on all single posts, and pages. Any members using a different theme who would like to have the button added, just let us know and we’ll see what we can do.

For those keeping score of popular posts, sending a post also counts as a “Like” so get sending those Tripawds posts to all your Facebook friends. For anyone interested in how we did this, read on…

How to add Facebook Send Button to Blog Posts

If you’re having a hard time figuring out Facebook’s Send Button instructions, don’t bother. They don’t work with WordPress anyway. The WordPress multisite gurus at WPMU Dev will likely release an awesome Facebook plugin soon, but if you can’t wait, here’s how I did it.

NOTE: Full credit is due to Ronnie at WPMU.org who wrote complete details about Using the new Facebook ‘Send’ button with WordPress.

1. Assuming you’re comfortable editing theme files and know how, copy this entire bit of code:

<div id="fb-root"></div>
<script src="http://connect.facebook.net/en_US/all.js#xfbml=1"></script>
<fb:like href="<?php echo get_permalink(); ?>" show_faces="true" width="450" send="true">

</fb:like>

2. Depending on your theme, find the file single.php or loop-single.php and save a copy, just in case.

3. If you have plenty of time on your hands, learn all about the Loop. You don’t need to know what it does, just where it is. But I digress.

4. Paste the code above somewhere in the loop. Search for “entry-content” and insert the code on a new line before the <div> to show the Facebook Like and Send buttons before at the top of all your blog posts.

4b. The proper location may be determined by “the-entry” or “post-content” – again, this will depend upon your selected theme. Play with positioning and check your work.

5. Finally, you can customize how the buttons display with some attributes.

That’s it! You can see the buttons in action at the top of this post. I also added the buttons to page.php so readers can send their friends helpful pages like the Tripawds Gear Shop. And I added it to various page theme files I customized during our Tripawds makeover, so they show on the Tripawds Forums, Chat and Store pages.

I also chose to hide facebook user profile avatars from showing beneath the buttons by adding the attribute: show_faces=”false”

Adding Facebook Send Button using an iFrame

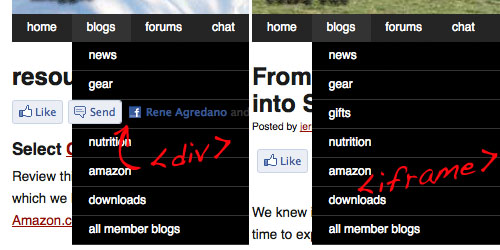
As with any coding project it seems, there is bound to be conflict somewhere. And I found it with this one upon discovering that the new Send button code provided above broke our dropdown navigation menus on the News blog.

facebook send button script breaks dropdown menu navigation iframe fix

Either the <div> or the script was causing the buttons to show through the menu, or the menu to drop down behind the buttons. However you choose to frame that, it wouldn’t work. So I fixed it with an iframe.

The WPMU Nelo Custom CMS WordPress theme from WPMU Dev that we use for the Tripawds News blog came with an integrated Facebook Like button option. I was able to fix the issue with a simple edit to the iframe by adding the attribute: send=true

Below is the iframe code we’re using on the News blog. It would get inserted in the same place as described above. (Use at your own risk.)

<iframe src="http://www.facebook.com/plugins/like.php?href=<?php echo urlencode(get_permalink($post->ID)); ?>&amp;layout=standard&amp;show_faces=false&amp;width=450&amp;action=like&amp;send=true&amp;colorscheme=light" scrolling="no" frameborder="0" allowTransparency="true" style="border:none; overflow:hidden; width:450px; height:30px"></iframe>
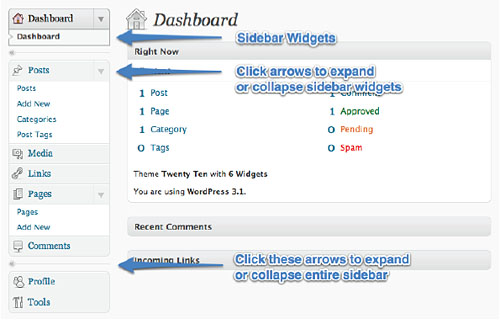
Download WordPress Guide To Easy Blogging

We considered posting this in the Tripawds Downloads blog, but it has much more to do with blogs than it is about three legged dogs.

Download Free WordPress Editors Guide

While we provide Tripawds bloggers with helpful WordPress tutorial videos, and do our best to answer any technical questions about blogging in the Tech Support forum, we want to provide more information for those who want it. That’s why we’re making this comprehensive guide detailing How To Publish a WordPress Blog available as a free PDF download.

How to Use WordPress Blog Dashboard

This comprehensive WordPress How To Guide covers everything you need to know about writing posts and pages, customizing your blog layout, moderating comments and much, much more. And did we mention it is absolutely free? This is just another value added service we are able to offer thanks to our WPMU Dev Membership.

Add ChipIn Widget To Tripawds Blogs

Let’s talk about widgets. Specifically, the 2010 Tripawds Campaign widget popping up all over the Tripawds community recently.

Tripawds is a user supported community, but we hate having to ask the community for support to keep this site up and running. So, the sooner we can reach our campaign goal, the sooner we can remove this annoying widget:

And here’s how you can help. In fact, here’s how you can add any widget to your Tripawds Blog sidebar. But let’s take a step back …

We are always happy to see new members join and create their own Tripawds Blog. But we are always surprised to see some of those same new blogs still have their default sidebars months later. We recommend all new bloggers view their blog and follow the helpful links provided in the default sidebars for doing things like changing the custom header, uploading user and blog avatars, and yes… updating the sidebars and widgets!

All blog themes available to Tripawds Bloggers include at least one sidebar. Widgets are sections that can be added to these sidebars from the Appearance menu of your blog dashboard. Standard widgets include a calendar for archived posts; lists for post categories, blog pages,  or favorite links (your blogroll); recent posts and comments; meta information; or any arbitrary text.

NOTE: Keep the Meta widget in your sidebar for easy access to your blog dashboard. If you remove it, you can always visit your dashboard at yourblog.tripawds.com/wp-admin

Simply drag the widget you want to the preferred location in your desired sidebar, and “drop” it. Configure any available settings, click save and visit your blog to see the changes.

The text widget is the one we’ll be using in our example here. Follow the instructions below to help show your support for the 2010 Tripawds Community Campaign by adding the ChipIn widget to your sidebar.

How To Add Chip In Widget to Blog Sidebar

  1. Copy the ChipIn embed code by clicking the “copy” link in the widget above.
  2. Visit your blog Dashboard -> Appearance -> Widgets tab.
  3. Expand the sidebar where you want to add the widget (If it is not already visible).
  4. Drag the Text widget to the desired location of your sidebar. (A dotted line will represent where it will appear.)
  5. Release the widget and an expanded field will appear.
  6. Add a title to your new widget. (i.e.; Help Support Tripawds!)
  7. Paste the entire ChipIn code you copied into the content area of the new widget.
  8. Click Save, and view your blog to see the changes.

You should notice the new sidebar widget in your blog, just like in the right sidebar of this blog. (NOTE:  If widget is missing here, the campaign must be over!) Don’t forget to remove the widget when we reach our campaign goal so we can stop begging for help. Thank you for yor continued support.

Any questions? Ask with a comment below or in the Tripawds Tech Support forum so we can share the answer with the community. If you’re wondering what the heck ChpIn is, click the “about” link in the widget or check out the Tripawds ChipIn Page for complete details.

We have a blog ring now.

Wanna see a random Tripawds Blog?

Every Tripawds Blog is now linked together in a true Blogger style Ring of Blogs. Users can now stumble upon another totally random three legged dog blog by following the links now found site-wide here at Tripawds. Each Tripawds Blog now has a common navigation strip, something like this…

» RANDOM TRIPAWDS BLOG » FORUMS » CHAT » DIRECTORY » JERRY’S BLOG »

By clicking the RANDOM TRIPAWDS BLOG link, you will be taken to the next RANDOM TRIPAWDS BLOG which has the same strip for visiting the next RANDOM TRIPAWDS BLOG, and so on, and so on.

For those wondering just who might be blogging about their dogs here, this is a easy way to discover what you’re missing. The top 100 active Tripawds Blogs are always listed on the directory page, but cruising the blogs this way should be more fun. We hope you enjoy it.

The only problem I see so far, is that many Tripawds members create a blog upon signup, but never actually start blogging. 🙁

So why not drop on comment on those blogs to let them know what they are missing? The more stories we can share here, the better a resource this community becomes for those facing cancer or amputation with their dogs.

So, how did I do this?

For anyone interested, I implemented this Blogger style blog ring for WorPress MU using these two free plugins available from the WPMUDev.org project repository:

WPMU Footer HTML
This WPMU Plugin enables you to insert any HTML into the footer of all blogs posted within a single WPMU install. With a little hacking, it will place inserts in the header too. Sure, it’s takes a little hardcode effort to customize, but for a CSS neophyte like me it just worked better than Global Header which had the sweet Admin interface I preferred.

WPMU Random Blog Redirect
This mu-plugin allowed me to create a global link to https://tripawds.com/?random which will redirect readers to a random Tripawds blog, in classic StumbleUpon-like fashion.

I am always cautious about installing old WPMU plugins, especially those that appear to be no longer maintained or supported. I much prefer to install the plug and play plugins available with our WPMU Dev Premium membership. But I wanted to make this specific functionality work, and I carefully tested things first on our development installation.

This version of Random Blog may be two years old, but it is apparently working fine. And since the discussion about WPMU Footer that helped me get it working seems to have disappeared into the ether, I’ll share how to ad header inserts in this global footer plugin…

First, I’m using v. 1.0 since v. 1.1 had some issues with the header inserts, which I just added right before the final php function:

add_action(‘wp_head’,’jas_wpmu_css_footer’)

Correct, the header insert code goes after that for the footer. Whatever, it works for me! No promises for anyone else. 😉

But your saying Jim, banner ads are in the header too? Using the WPMU Dev Premium Supporter plugin, we are able to automatically remove banner ads from all blogs while keeping the community navigation strip. I did this by wrapping the ad code within an optional Supporter script and placing HTML for the navigation after that.

Hope this helps clear up any questions about the new Random Tripawds Blogs navigation strip, and how it got there.

UPDATE: Download WPMU Footer HTML v.1 here.

Supporters Demystified

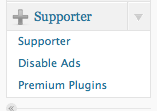
wpmu premium supporter wordpress menu tabTripawds community members may have some questions about the enhanced features enabled for Supporter blogs. WordPress MU site administrators might be interested in how the upgrade function works.

I hope to shed some light here on all of the above. So, let’s talk about Tripawds Supporters and the WPMU Dev Premium Supporter plugin.

As a reminder, all free Tripawds Blogs include basic comment spam protection – using the TypePad anti-spam plugin – and 25MB of upload space for storing photos. Free blogs also show banner ads at the top and bottom of every page. The Supporter mu-plugin allows us to automatically increase a Supporter’s upload quota to 1GB and turn on enhanced blog features by activating additional plugins on that blog. It also immediately removes the banner ads from upgraded blogs, and allows Supporters to turn off ads on other Tripawds blogs. Best of all this is all done automatically upon upgrade, which can be done via single payment or recurring subscription.

I would like to think I was at least a little helpful in identifying certain issues with the new Supporter v. 2.0, but I can take absolutely no credit for the amazing development work and quick update release. We are now running Supporter v. 2.0.2 and I am happy to say it’s new features are impressive. How does it work? The mu-plugin includes various files, some required, others optional, all of which are simple to install if you can follow the clear instructions. Let’s take one feature at a time…

Hiding Ads on Supporter Blogs

For Site Administrators: a small snippet of code is used in conjunction with an optional component (supporter-ads.php) to show or hide whatever text you want, wherever you want. We use it to hide Google ads in the header and footer of Supporter blogs. Simply wrap the AdSense HTML within this snippet where indicated, and it will only display if the the blog is not a Supporter. The exact opposite can be done with a different bit of code, showing any desired text only on Supporter blogs. There are also admin settings for the number of blogs – from 0  to 100 – on which ads that can be disabled by Supporters.

For Tripawds Members: There is no need to anything to remove ads from your blog, other than upgrade to Supporter status via the Supporter tab in your blog dashboard. Ads will immediately disappear upon upgrade. An added plus for Supporters is the ability to turn off ads from displaying on up to 10 of their favorite other Tripawds blogs. After becoming a Supporter, simply visit your Blog Dashboard -> Supporter -> Disable Ads. Simply follow the instructions there to search for blogs on which you wish to turn off the ads. Add them to your list, and you will no longer see ads when visiting those blogs.

Activating Premium Pugins

For Site Administrators: The new Supporter admin menu now includes plugin management features very similar to the free WPMU Plugin Manager mu-plugin. No surprise really, considering it was built by the same developer. Many kudos to Aaron for adding functionality for admins to enable plugins on non-supporter blogs. But using the Premium Plugins menu, admins can simply select which plugins they want Supporters to have, with the following options:

  • None: Plugin is available for activation by site admins only
  • Anyone: Plugin can be activated by any member blog
  • Supporters: Plugin is only available on Supporter blog
  • Supporters (Auto-Activate): Plugin is automatically activated on Supporter blogs upon upgrade

For Tripawds Members: For non-supporters, the Blog Dashboard -> Plugins tab will show the TypePad Anti-Spam plugin, which should be activated if it is not already. This will help reduce the spam comments received through your blog. There will also be a list other plugins available upon Supporter upgrade. Here is a rundown of the plugins we currently offer Supporters, and their status upon upgrade:

  • WP-SpamFree (Auto Activated): This powerful anti-spam plugin will virtually eliminate comment spam. Includes a spam-free contact form that can be easily added to your blog. Visit plugin website
  • Viper’s Video Quicktags (Auto Activated): Easily embed videos from various video websites such as YouTube, DailyMotion, and Vimeo into your posts. Visit plugin website
  • Subscribe To Comments (Auto Activated): Allows readers to receive notifications of new comments that are posted to an entry after they have commented on the post. Visit plugin site
  • All In One SEO Pack (Requires Activation): Comprehensive Search Engine Optimization options for your blog. Visit plugin website

Offering Premium Themes for Supporters

For Site Administrators: Much like Premium Plugins, the new version of Supporter now allows site admins to make certain blog themes only available to supporters. All members would be able to preview how their blog looks in the Premium theme, but they would be presented with a message about upgrading upon an attempt to activate it.

For Tripawds Members: We have not yet implemented Premium Themes as we are still seeking feedback about which themes might be considered, well … premium! We offer more than 100 blog themes and in all honesty have only tried out a handful. A whole bunch of new themes are in the works so stay tuned.

What does it cost?

For Site Administrators: All of the WPMU Dev Premium plugins, themes, videos, and support are included with a WPMU Dev Premium membership subscription. Site admins can set the price for Supporter upgrades for one, three, and twelve month subscriptions or for the single payment method. An option for setting the number of free days blogs have with Supporter features is also available. The new Supporter sign-up page even includes daily cost calculations to show members what they can save by upgrading for longer periods.

For Tripawds Members: A Tripawds Supporter blog upgrade subscription costs only $25 a year. A one month subscription costs $5, and we offer three months for $10, so savings are clearly realized with the annual option. We chose the subscription method (over single payment) since Supporter features are automatically disabled upon the expiration date. We don’t want any members getting surprised by deactivated plugins, so we went with the automatic renewal.

NOTE: Be sure to cancel your PayPal subscription before it expires if you do not want to pay for another year of enhanced blog features!

Believe it or not, this just brushes the surface of all the new features available in Supporter 2.0, but hopefully it explains a few things for our members. We would love to hear your feedback, so please leave a comment below. Or, feel free to ask any questions in the Tripawds Technical Support discussion forum. We’re especially interested in what Tripawds members think about the subscription vs. single payment method for Supporter upgrades, and whether anyone is interested in using the new optional Amazon payment gateway.

For the record, as of today there are eight active Tripawds Supporter blogs. With nearly a thousand members, and operational expenses in the thousands of dollars, please don’t think we actually making money here. We offer plenty of tips to make the most of free Tripawds Blogs, and use these Supporter features to thank those members who generously show their support.

Behind the Scenes is brought to you by Tripawds.
HOME » NEWS » BLOGS » FORUMS » CHAT » YOUR PRIVACY » RANDOM BLOG