TRIPAWDS: Home to 23104 Members and 2159 Blogs.
HOME » NEWS » BLOGS » FORUMS » CHAT » YOUR PRIVACY » RANDOM BLOG

How to Change WordPress Admin Username and Why

I’m reblogging this from our business site for any WordPress Multisite Network Admins looking for an easy way to change their username in the wake of recent brute force login attacks, or wondering what happened to their Super Admin menu items after they did so.

What does this means to Tripawds members? Only that we are on top of things wen it comes to maintaining and securing this community. Thank you for your support.

From the Team Agreda News Blog…

WordPress BadgeFair Warning: This is a bit more technical than our usual home based business tips.

With all the news about recent brute force bot attacks on WordPress sites, however, and considering the number of WordPress sites out there, this is vital information for anyone with a WordPress Admin account.

There are plenty of articles about the WordPress Admin Botnet, so I’ll get straight to dealing with it. In short, hackers are breaking into WordPress sites using brute force login attempts on any “Admin” accounts, the default username for site administrators.

The first line of defense is to ensure you have a strong password. Change yours now, I’ll wait. that’s the first thing I did a few days ago as news of the attacks surfaced. As reports increased, more drastic steps were clearly necessary to protect all our websites.

The second (and most effective) step in thwarting these particular attacks is to change your default Admin username. You can’t just do that from your user profile, but there are various methods. One easy way to change the Admin username is to create a new user account with Admin permissions, then delete the original Admin account and transfer all posts to the new user. That’s great for the basic WP install, but it doesn’t help those of us running SimplePress Forums or multisite communities.

NOTE: Deleting an account and transferring the user’s blog posts will not reassign that user’s forum posts, permissions, subscriptions, etc. when running SimplePress.

How to Change WordPress Admin Username via PHP MyAdmin

The following are steps to quickly and easily change the default WordPress “Admin” account username in your database using PHP MyAdmin. This is less daunting than it sounds, but it does assume you have cPanel access and are familiar launching PHP MyAdmin. If not, review these simple steps with screenshots for doing so.

SIDENOTE: What that article does not address, however, is how doing so will affect your Super Admin capabilities if you are a multisite network administrator. I found out the hard way. Read on for details.

1. Log into your cPanel account, launch PHP MyAdmin and open the database for your WordPress installation.

2. Select your wp_users table and edit the row for your Admin account, usually the first, with ID 1.

edit wordpress admin username

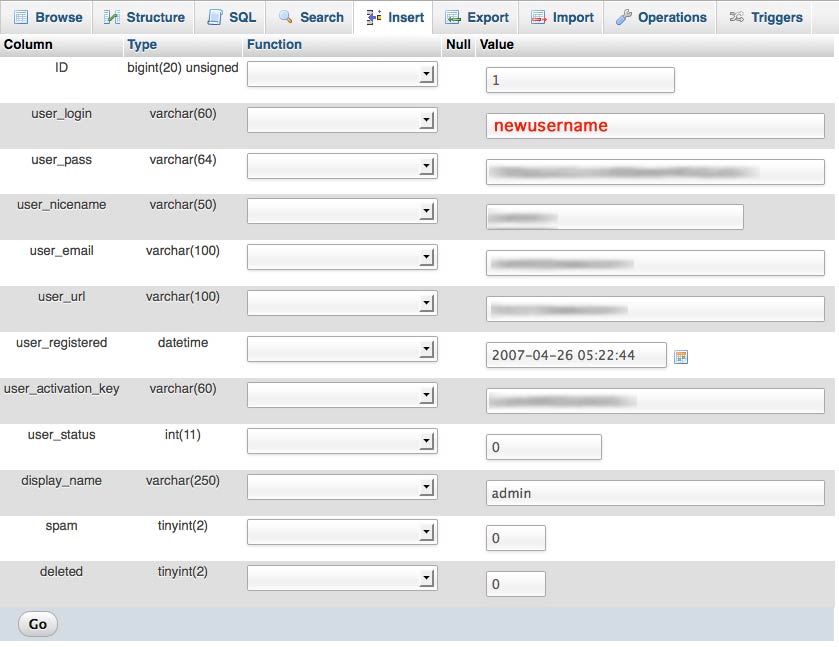
3. Enter your new desired username in the user_login data field.

4. Click Go. That’s it! Log in with your new username and existing password.

That’s it? Well not quite if you are a multisite Super Admin. Stop here and you will discover the Super Admin menu items have disappeared once you log back in. Don’t panic.

How To Change Default User Name For Network Super Admin Account

WordPress keeps track of Super Admin users in the wp_sitemeta table. Follow a couple more steps to ensure you retain Super Admin powers when changing your Admin username.

1. Change Admin username as described above.

2. Browse your database for the wp_sitemeta table and edit the site_admins row.

wp_sitemeta site admins 
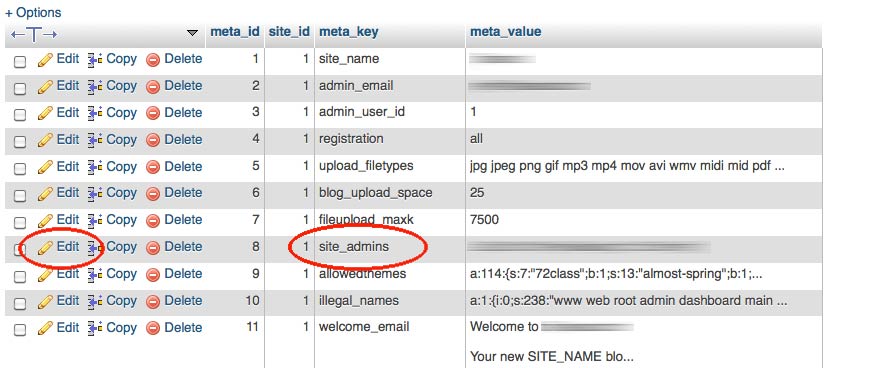
3. Note the meta value for existing Super Admins. It will look something like this:

a:1:{i:0;s:5:”admin”;}

In this case, the 5 indicates the username has five characters, and the username is admin. Other variables may be included in this array if you have more than one Super Admin, but you get the point, right?

wp_sitemeta site admins

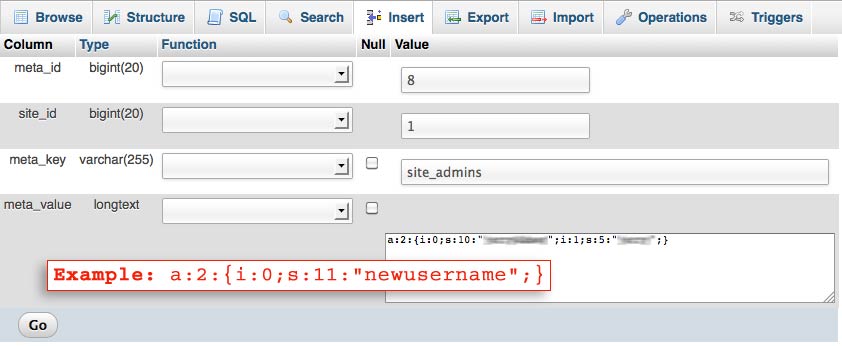
4. Edit the meta value for site_admins to include the new user name you changed in the first steps above. For example:

a:1:{i:0;s:9:”mynewname”;}

Note that the integer must change in relation to the number of characters in the username.

5. Click Go. That’s it, really!

Follow the simple steps above and log back into your site with your new user name and existing password. If you’re a Super Admin, you will still have your magic menus for doing all your network related stuff. And if you’re a SimplePress Forums Admin, you will still have all your posts and the permissions you need to keep managing your forums. you can even keep your display name as Admin and nobody will be the wiser.

How To Prevent Users from Creating Admin Accounts

If you’re running your own WordPress multisite network, you may want to consider this one extra step to ensure nobody creates another account with the Admin username. Not that they would actually have administrator capabilities, but better safe than sorry…

banned wordpress account user names

While logged in as Super Admin visit your Network Settings page and ensure that your list of banned usernames includes “Admin” and your site will never have another Admin user account.

Any questions?

How to Fix TimThumb Theme Script Security Exploit

Don’t panic. Security Breach Averted!

I first learned about the zero day vulnerability affecting many WordPress themes today on LinkedIn. Plenty has been written about the security flaw found in the timthumb.php script used by many themes that could result in a serious security breach by allowing the upload of malicious scripts to your server. I won’t go into detail, because these fine folks already have:

See the above links for plenty of information, opinions, and fixes. I’ll just quickly outline what I did to ensure we remained safe here at Tripawds.

  1. Log in to cPanel account for domain
  2. Access File Manager
  3. Search all files for “timthumb”
  4. Note location of file(s) if found
  5. Delete timthumb.php*
  6. Repeat for any other domains

*Note: Deleting the TimThumb script may break certain themes, or at least affect how they manage and display images. I chose to just delete any themes using the script.

If you need the TimThumb script running on your site, upgrade to the latest version. This issue has already been addressed. If, like me, you find some merit in the many discussions about the safety – or lack thereof – of allowing any scripts on your server to access data from third party sites, then delete the file. Or, follow these steps to remove the vulnerability:

Line 21: Ensure this constant is false:
define ('ALLOW_EXTERNAL', FALSE); // allow external website (override security precaution - not advised!)

Line 27: Remove all domains from this array:
$allowedSites = array();

What the TimThumb Issue Means for Tripawds Members

Nothing, really. Because we’re on top of things.

If, however, you are a Tripawds Supporter and had activated either of the premium themes, Magazeen or Mystique, you will need to activate a different theme. If you were using either of these themes and you cannot access your blog, again, don’t panic. Point your browser to yourblogname.tripawds.com/wp-admin/themes.php and select another of the more than 135 themes we make available to Tripawds bloggers.

Quick Fix for WordPress Trackback DoS Exploit

One thing about the WordPress development community, is that they are on top of things when it comes to potential exploits of the system. Just this morning there were numerous reports of Denial of Service (DoS) attacks upon hosted WordPress websites and WPMU blog communities, like this one. Steve Fortuna quickly posted a fix. Within minutes I found the detailed WordPress DoS Attack Script Solutions described in the HashBangCode blog and implemented them on all our sites. The last thing we need is another mysterious server load spike bringing down the Tripawds server.

For anyone interested, and daring enough to follow my directions — note this blog’s tagline — the fix is relatively simple:

Just insert the following to your wp-trackback.php file at line 47:

// DoS attack fix.
if ( strlen($charset) > 50 ) {
die;
}

The HashBangCode blog goes one step further and recommends adding the following at line 57 (assuming you added the above already):

// DoS attack fix.
if ( strlen($title) > 200 ) {
die;
}

For those who may be uncomfortable with editing core files, this plugin stops WordPress trackback DoS attacks.

I understand this all may mean absolutely nothing to Tripawds Bloggers, except to know that we too are on top of things when it comes to keeping Tripawds Blogs Community up and running. But I figure the faster news of fixes like this can be spread, the more likely we are to stop spammers and hackers in their tracks.


125x125-banner.png
Many thanks to drmike for first bringing this to my attention in the WPMU DEV Premium discussion forums. Yet another reason we are happy with our WPMU DEV Premium membership!

New Easy Method for Embedding Videos

It came to my attention that the Unfiltered MU plugin we were using to allow Tripawds Supporters to embed YouTube movies in their blogs, posed a security risk for the entire Tripawds Blogs Community. Apparently it could be used to embed rogue code for the nefarious purpose of stealing login cookies, among other things. And we don’t want any impersonated impersonated users running around here wreaking havoc. It’s not that we don’t trust our members, but we do spend an awful lot of time fighting spam blog registrations.

So, Supporters won’t find Unfiltered MU in their plugins menu anymore. But don’t worry, we’ve already implemented an even easier way to embed movies from all your favorite video sharing sites. And you no longer need to copy the entire embed code or use the HTML editor. Just visit your blog Dashboard -> Plugins -> Installed  -> and Select Viper’s Video QuickTags -> then click Activate. You will then notice a new row of buttons in your Post Editor the next time you update your blog. Simply put your cursor where you want the video to appear — in a new paragraph by itself is recommended — and click the button for your video sharing website. You can then enter the view page and and click Okay. The Viper’s Video QuickTags plugin will do the rest, inserting a quicktag where the video will appear.

A quicktag is a simple snippet of code. In this case, one that will embed a movie from the video’s view page URL entered using the embed buttons. This code will show in your post editor where the video will appear. The video will then display once the post is previewed or published.

Viper’s plugin has detailed online help on your Dashboard -> Settings -> Video Quicktags page which lets you configure preferences for all the different video sharing websites, including what buttons you want displayed in your editor, the default size of embedded videos, and much more. If you still have questions after reading the online help, or need assistance getting the plugin working, please ask in this Tech Support forum topic about how to embed videos.

Please note that all previous blog posts you may have that include an embedded Flash object, like a YouTube or MySpace video, will continue to display the video just fine. That is, until you edit the post! Editing any existing post will strip out the object embed code. You would then need to re-embed the video using the new, easier Quicktags method.

Embedding videos in blog posts is just one of the many enhanced features available to Tripawds Supporter Blogs, made possible with the WPMU Dev Premium Supporter plugin. More details about that coming soon, like how it lets us automatically remove banner ads from Supporter blogs upon upgrade. Any Tripawds Blog can be upgraded via PayPal subscription by visiting your blog Dashboard -> Supporter Tab. Thank you for your continued Support.

Behind the Scenes is brought to you by Tripawds.
HOME » NEWS » BLOGS » FORUMS » CHAT » YOUR PRIVACY » RANDOM BLOG